NORTON OIL PRESSURE GAUGE
Norton Motorcycle oil pressure gauge kit
Installation and use instructions
British motorcycles for years had oil pressure indicators located in the pressure relief valve. These were sources of oil leaks and were discontinued in the mid 1960’s. From then until 1969 when a pressure switch was fitted on Triumph and BSA machines oil pressure was assumed but not always consistent. Norton never did fit a pressure gage assuming that the pump and oil system would be fault free. It is reassuring to see by a gauge just what your oil is doing and can save you many times the cost of a gauge if your oil system fails.
Understanding your oil system . Norton and BSA use modern gear type pumps that are more able to cope with oil impurities. BSA has issues with the alloy pump bodies deforming with use and loss of oil pressure. Norton has issues with the 2 securing studs coming lose and loss of pressure at the pump to case joint.
Norton installation instructions:
1. Norton twins take oil pressure from one of the rocker spindle covers. Norton pressure feeds the rocker arms from 1968 on and all Commando models. An adaptor replaces one of the rocker spindle covers.
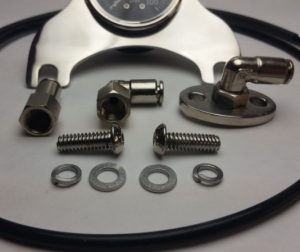
2. The Norton kit consists of the gauge, triple clamp mount, high pressure hose and adaptor fittings. Thread the adaptor to the underside of the oil pressure gauge. Press one end of the high pressure oil hose into the fitting on the adaptor. Mount the gauge to your handlebars clamps, See photo. Route the hose so it does not interfere with the operation of the handlebars.
3. Set a rag under the right hand spindle cover and remove the 2 securing bolts, then remove both cover plates. A small volume of oil may leak out during this procedure. Fit the adaptor to the rocker spindle us-ing the stainless bolts and gasket supplied with the kit.
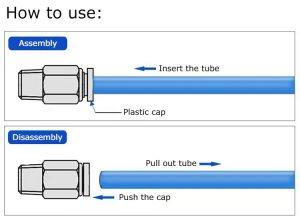
4. Cut the oil hose to the appropriate length and press one end of the high pressure oil hose into the fitting on the adaptor. This may take some effort. You will feel a distinct click when the hose seats in the fitting. Gently pull on the hose to be sure it has seated.
5. Route the hose well away from the hot exhaust pipe and zip tie to the frame. Be sure to route so that the steering is not impaired and the hose can not be chaffed or pinched. After routing cut the hose to length and use the same procedure as the case adaptor to press the hose into the adaptor on the back of the gauge. Note that the air bubble in the gauge is to allow the damping fluid in the gauge room to expand and is normal.
6. Turn the handlebars lock to lock to be sure that the oil hose does not impair steering and there is nothing that might snag of cut the hose. Oil is under considerable pressure in that small hose and if cut it will lose a huge volume in a short time.
7. Now start the engine and watch for leaks at the connections and the adaptor. If there are any leaks at the hose try pushing the hose further into the adaptor/gauge.
8 The gauge and hose will give trouble free service for years and should require no further attention. Oil pressure for Norton should be about 60 – 70 PSI cold and 40 – 50 Hot at 3000 RPM. Do not be alarmed if oil pressure is 5 – 10PSI at idle, this is common on Norton machines.