Click Here to download JRC Carb Tuning Guide
Click Here to Order JRC Carb Spares
INSTALLATION GUIDE FOR
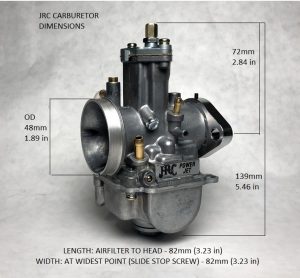
THE JRC 26 or 30MM FLATSLIDE
CARBURETOR
Introduction
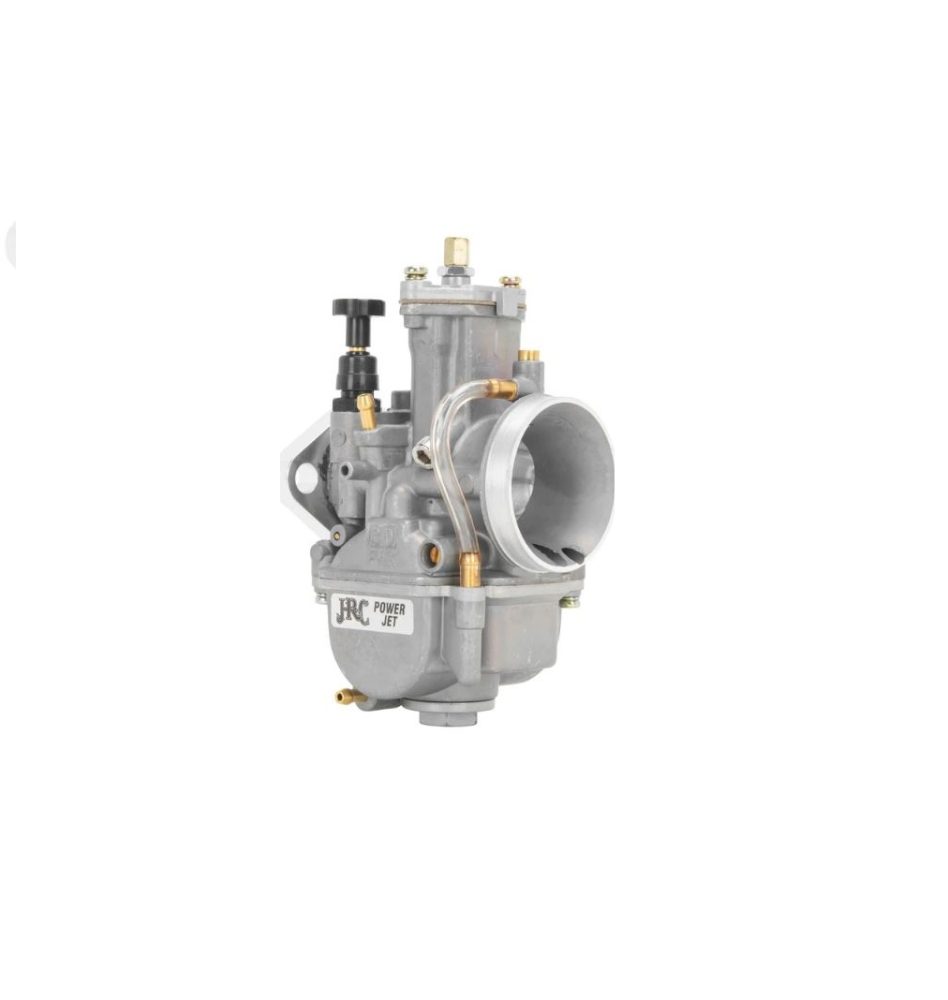
Congratulations on your purchase of the JRC flat slide carburetor. This carburetor has been developed to give better starting, engine performance, and throttle control for your classic motorcycle. The procedure to install it, depending on the level of experience of the installer, takes approximately 60 minutes to perform.
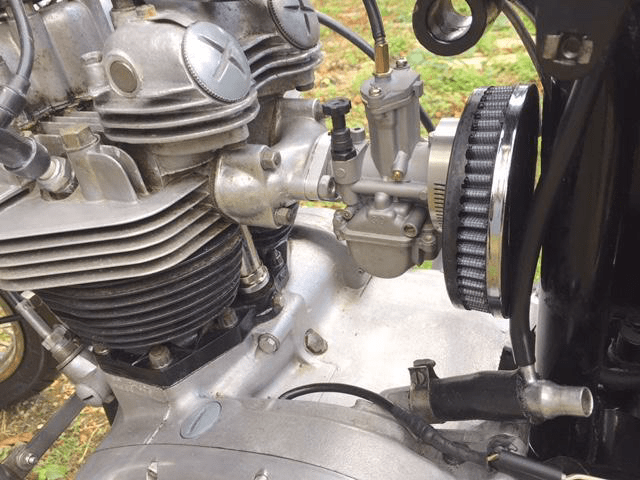
Fig.1
Note: A cable operated choke is available for single, twin and 3 cylinder applications.
Tools Required:
Whitworth wrench set pre 1968 British Machines (tightening flange nuts, 1/4w, 5/16bs)
SAE wrench set post 1967 British Machines (tightening flange nuts, 7/16 and 1/2 sizes)
Metric wrench set (for removing: float chamber plug 17mm, main jet carrier 10mm, main jet 6mm)
Phillips or cross head screw driver (removing: the carburetor top and float chamber)
– latest carbs have 3mm allen screws (key provide with carb)
Flat head screw driver thin (removing the pilot jet)
Installation Procedure
The first step is to disconnect the battery to ensure no sparks occur around gasoline vapors. Then remove
the old carburetors and gasket(s) and detaching the throttle cables. Be sure to take extra care with regard to fuel
during this step. Gasoline is extremely flammable and fumes may be ignited by appliance pilot lights from a
surprising distance. Be careful to work in a well ventilated area. When in doubt work outdoors.
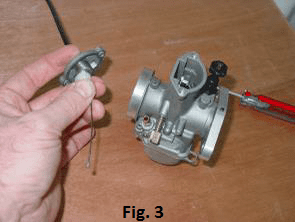
This will leave the manifold bare as shown. (Royal Enfield Bullet shown)
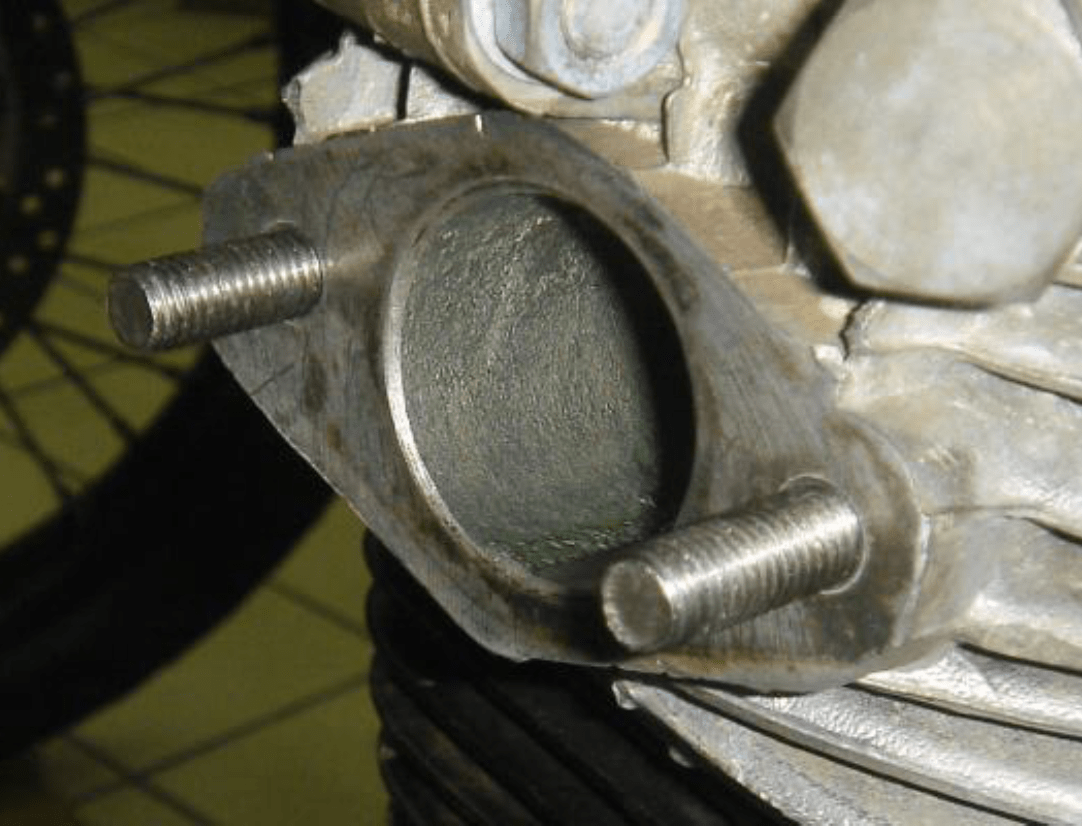
Fig.3
Step two involves attaching the throttle cable to the slide assembly. To do this unscrew the two screws at the
top of the throttle slide housing assembly taking care to keep a finger on the top as once the screws are
undone the spring inside will push upwards.
Removing the top cover, the spring, white collar, will leave the chromed slide and needle inside the housing.
Having removed the top cover, push the nipple
end of the throttle cable through the top cover
and down the center of the spring and through
the white retaining collar. Note that the white
retaining collar must be installed the same
direction it comes out. Compress the spring
and hold it all together so as much of the cable
is showing as possible.
Note: Return springs of different spring rates
are available from your dealer.
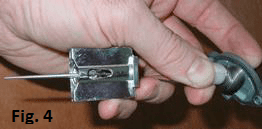 Fig. 4 Now insert the end of the cable so that
the nipple sits in its place in the throttle slide.
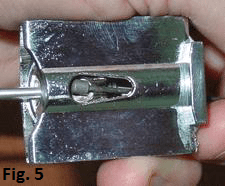
Fig.5
JRC Superior carburetors are pre-jetted if the application is specified upon ordering. If no application was given the carbs are supplied with the factory jetting specs. Jetting is done for the stock motorcycle not taking into account any modifications that your bike may have. If you tell us, for example: that your bike has open pipes we can adjust the specs accordingly.
Insert slide into the throttle housing ensuring it is the correct way round. NOTE – there
is only one way it can be inserted, no force should be applied for this.
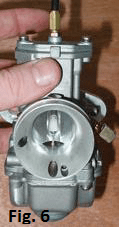 Fig 6.
Re-position the top cover and screw back into
place taking care not to over tighten the screws, Be
sure that there is enough free play in the cable that
the throttle slide sits full closed.
NOTE –The weight of the carburetor should not
hang from the cable alone. Support the carburetor
with a length of wire.
The next step is to ensure the ‘O’ ring is in its seat on the face of the flange and the gasket is on the
threaded studs against the head. Mount the carburetor onto the studs fully and put on the washers and nuts and
tighten them up with the open ended spanner. Do not over tighten the nuts.
Fig.7
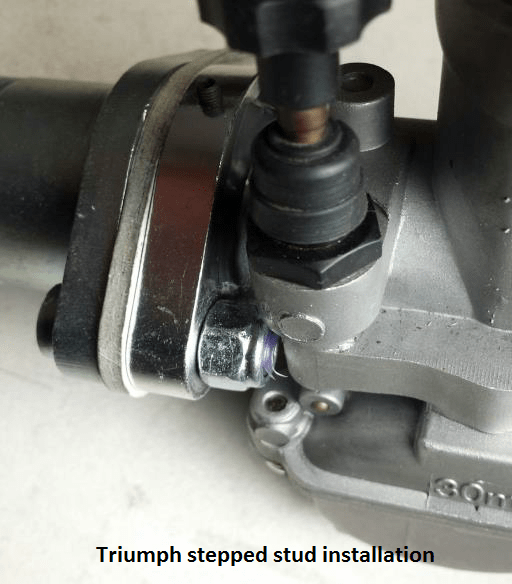
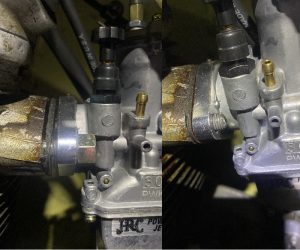
Note: On 1969 and later Triumph models delete the cupped steel and rubber washers and replace with
flat and lock type nuts. Make sure to use the insulator block 70-2968 on all applications. Your
machine had these fitted with the original carburetors and it is acceptable to re-use them.
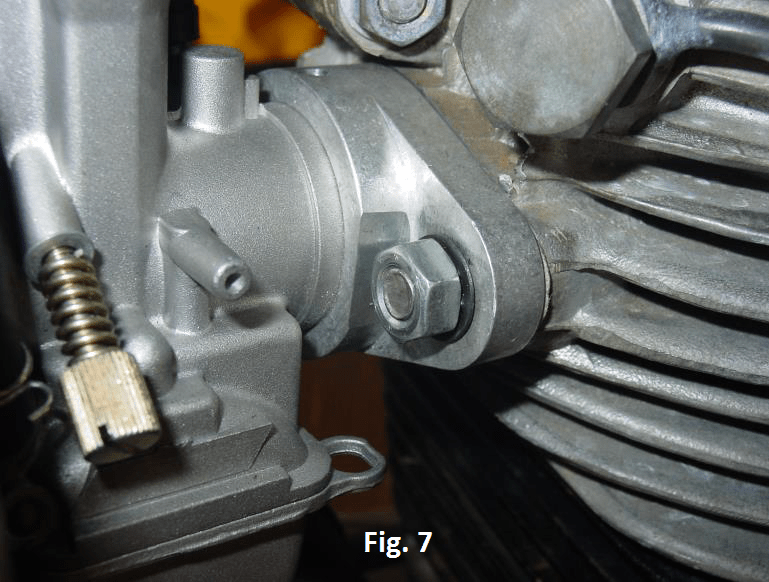
(Fig. 7 Royal Enfield specific unit)
Top picture showing heat insulator and lock nuts on Triumph manifold.
With limited space the use of a thin nut on the choke/enrichener side is advised.
Also a heat insulator between the carb and manifold/head is recommended. Otherwise the left hand mounting stud may be too long and need to be shortened.
Our 2 inch flanged carbs are supplied with a thin nut in both early and late 5/16 threads.
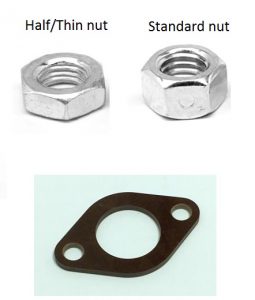
Thinner nuts are available:
5/16×26 CEI Pre-68 machines – 57-0224
5/16×24 UNF Post 68 machines – 14-0402
Heat insulator:
available in 26-32mm bore sizes
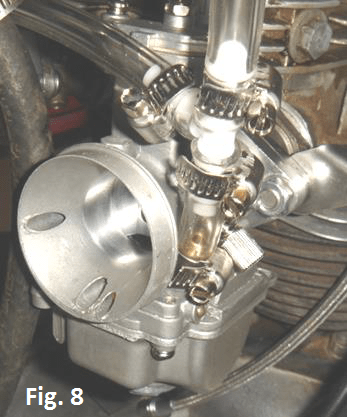
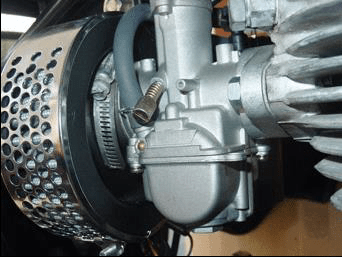
Fig.8
Final step is to fabricate fuel lines. Always use clamps on fuel hose and always use
ethanol resistant hose. A 12 inch piece of fuel line, and hose clamp, is included with each carburetor we sell. We can supply addition hose and fittings if needed.
Now fit the air filter. The stock pancake Volkes type filter will fit as long as it has the removable insert and is for a 900 or 389 series Amal carburetor. The 26mm Amal has smaller threads so a larger filter must be ordered. (also available from JRC Engineering, please see website or catalog for details). Offset inlet for single carb and center inlet for twin carb models is the typical set up for air cleaners after 1967.
Fig.9 Jets
The carburetor comes with extra jets, a pilot and four main jets. The main jet and needle jet can be
changed easily whilst the carburetor is mounted in place on the bike. Changing the pilot (slow jet) will require unmounting from the engine.

To replace the main jet, the
bottom large nut at the base of
the float bowl can be removed,
Fig.9 (remember to turn off your
fuel tap from the tank). Some
fuel will spill out so have a large
rag or bowl to catch it. A couple
of small spanners will be
needed to remove the jet.
Tools Needed:
17mm wrench (drain plug), 10mm wrench (main jet carrier), 6mm wrench (main jet)
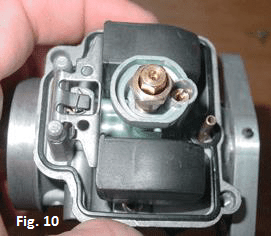
For changing of the pilot jet, the float
bowl needs to be removed to gain access
to it and this can be done by removal of
the two screws. Latest batches use 3mm allen key (included with carb).
NOTE – the bowl needs
to be gently maneuvered around to
release it as there are the floats and
internal structure inside. This must be
done very gently for both removal and reinstallation.
Fig. 10 shows what is there
once the bowl is removed (in the photo
the carburetor is removed from the bike
and sitting on a bench).
Now the question is:
How do I determine what size jets I need? Is there a crossover chart between Amal and JRC (Keihin PWK) jets?
Sadly there is not a crossover. And here is why:
Amal jet numbers represent the flow rate expressed in cubic centimeters of fuel a minute. IE: a 150 jet will pass 150cc/min. #25 25cc/min. The Amal needle jet is the only jet that the number reflects the actual orifice size. IE: 106 is .106 inches.
For Keihin Carbs the jet sizes refer to the metering orifice diameter, expressed in millimeters. IE: A 100 main jet is 1.00mm in diameter. A 120 main 1.2mm. Slow jet # 38 is 0.38 mm in diameter. There exists no chart showing flow rate for Keihin jets. This would allow us establish a pattern to where they are similarities in flow. Though the results will likely be non-linear and inconsistent.
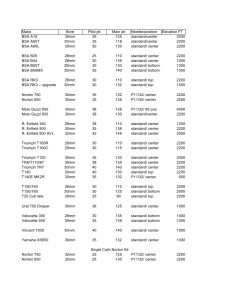
Below you will find a chart of tried and tested jet specs for various machines. We continue to add and revise this list so please forgive us if there are any errors.
DISCLAIMER
The steps in this guide are just that, a guideline only. Anyone wishing to install the carburetor
does so at their own risk and JRC Engineering cannot accept any liability for any loss,
damage or claims arising as a result of any work or action carried out based on the
information given in this guide.
Note:
1. Always turn fuel taps to “Off” position when the engine is not being run, even for a short
time.
2. All rubber components supplied with JRC Carburetors are suitable for use with 10%
ethanol fuels however with the advent of 15% fuels JRC does not recommend use of any
greater than 10% ethanol blends.
3. It is recommended also that all rubber O rings on jet blocks and float bowls be replaced
whenever they are disturbed. We have priced these at very low cost to encourage
replacement.
4. Ethanol and the moisture it attracts is extremely corrosive so we further highly recommend
that if your motorcycle is to be left standing for more than two weeks that you drain the float
chamber by removing the drain on the bottom. Ensuring the fuel taps are in the off position do
this in a well vented area and have a catch basin under the float chamber to capture the small
amount of fuel that will drain out.
It is suggested if you do not feel confident enough to perform the installation
procedure on your own that you engage the services of a professional
motorcycle technician to do so on your behalf
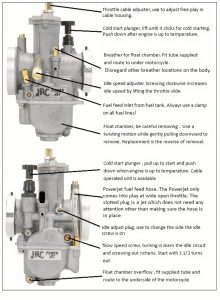
Breather hose locations
While the carburetor body has a few stubs for overflow tubes only two actually are used in our application.
They are indicated below by arrows. The stub opposite the cold start plunger is the only stub on the body used.
Breather number two is on the side of the float chamber. Both tubes should be directed toward the ground.
Their purpose is to direct fuel away from the hot engine in the event of a fuel spill.
If more than a small amount of fuel comes out the float may be hanging up or debris is holding the valve open.

Additional information on your JRC carburetor.
Accessories and kits available;
1. Cable operated choke assembly for single , twin , and 3 cylinder applications
2. Fuel line and fuel fittings to make custom fuel lines
3. Air filters , custom and original type
4. Throttle cables for single , twin or 3 cylinder applications
5. Carburetor kits for Norton Commando single 30 or 32mm
6. Carburetor kit for TR6/7 to fit standard air filter box, 30mm
7. Carburetor kit for T140E 1979-82, replaces Mk2 Amal or Bing
8. Carburetor kit for new Royal Enfield 500, 30 or 32mm
9. Carburetor kit for Ural twins
10. Trident and Rocket 3 gantry conversions to keep stock air box and gantry
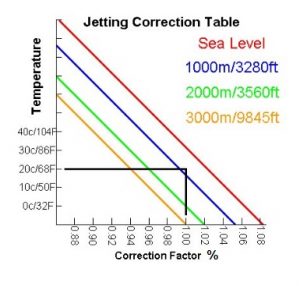
For higher elevation 4000 ft +jetting deduct 2-5% from the jet sizes. Use the nearest size round up.
Check out our carb fitted to various applications. Click the links below:
Triumph Bonneville 650 – pair 30mm
Triumph Daytona 500cc – pair 26mm
Triumph Bobber 500cc – pair 26mm
Triumph and BSA 3 Cylinder Machines – three 26mm
Triumph and BSA Unit Singles 250-500cc – 26mm
BSA A7 500cc – 26mm or A10 30mm
Norton Commando 750 and 850 – pair 30mm
Norton Commando 750 or 850 Single carb -32mm
Royal Enfield 350 Bullet – 26mm or 500 Bullet 30mm
Royal Enfield 500 Bullet – AVL motor – 32mm
Royal Enfield 750cc twin – pair 30mm
Moto Guzzi V50 500 V twin – pair 26mm
Mongomery Wards Lawn Tractor -26mm
CUSTOM FITMENT REQUESTS ARE WELCOMED
THE FOLLOWING MOUNTING OPTIONS ARE AVAILABLE UPON REQUEST:Keep in mind when selecting a bore size that you want a smooth transition in the inlet track.
Too large a bore and there will be a step or raised portion that will obstruct air flow.
This will need to be corrected for by slightly beveling the inside of the edge of the inlet manifold.
The largest carburetor might not be the best fit for an application.
Too large and you loose bottom end torque. Too small and the top end performance suffers.
BORE SIZES JRC-30PJ, 28, 26, 24, 21mm:
(NO LETTER SUFFIX) STANDARD 2IN FLANGE
(B) 35mm spigot
(E) 38mm spigot – MK2 carb replacement/ New Ural 750
(A) 58mm horizontal flange – New Enfield
(C) 53mm vertical flange – Ural Dneper/ BMW
BORE SIZES: 32, 34mm
(NO LETTER SUFFIX) 38mm spigot – Norton 2-1 manifold kit
(A) 58mm horizontal flange – New Enfield AVL motor