

Mar 3rd 2016
Piston Ring Seating & Break-In Guide | JRC Engineering
Piston Ring Seating: Why Rings Fail to Seat and How to Break Them In Correctly
Almost every case of smoking or a seized piston at break-in comes down to one thing: the rings never seated. This guide covers why it happens, how modern oil works against you, and the exact procedure we use at JRC Engineering to get grey cast iron rings seated on vintage British engines — the first time.
Why Piston Rings Must Make Contact with the Cylinder
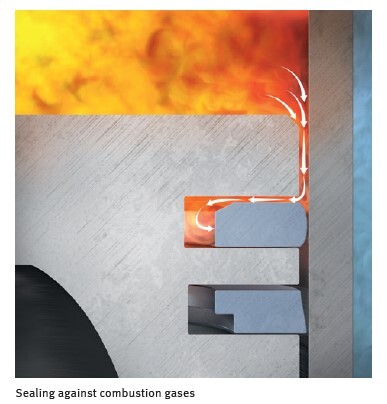
The piston ring has one job: seal combustion gases on the top side of the piston from escaping to the crankcase. To do that, the ring face must match the cylinder wall along its full diameter and width. That match only happens through actual metal-to-metal contact during break-in — there is no shortcut.
During break-in, combustion pressure (brake mean effective pressure) gets behind the ring and forces it outward against the cylinder wall. This controlled wear allows the ring to conform to the bore and allows the cylinder to develop a consistent contour along the stroke. Once that contact is made, heat transfers efficiently through the rings into the cylinder wall, keeping the piston cool and the combustion chamber sealed.
The numbers bear this out: approximately 70% of the heat absorbed by the piston during combustion is dissipated through the piston rings to the cylinder wall. The compression rings carry most of that load. Without adequate ring-to-wall contact, the piston has no way to shed that heat. It continues expanding in the bore until it seizes — sometimes within minutes of initial start-up on a badly glazed cylinder.
Why Modern Oil Prevents Ring Seating
Modern engine oils — and this does not mean pure synthetics alone, it includes most modern conventional oils — are formulated with friction modifiers to meet current emissions and fuel efficiency standards. The film strength of these oils can be so high that the ring face never contacts the cylinder wall during break-in.
That film strength is exactly what you want once the rings are seated. During break-in, it works against you. Grey cast iron rings are not lapped round and true at the factory; they are designed so the cylinder provides the final finish. They require a coarser cylinder surface and actual contact to seat. Modern friction-modified oil can prevent that contact from ever occurring, resulting in rings that never seat, a glazed bore, and a motor that smokes indefinitely.
There is also a metallurgical reason why grey cast iron specifically benefits from a drier assembly: cast iron contains graphite veins throughout its structure. These graphite deposits act as a natural dry lubricant and a micro-reservoir for oil. Cast iron rings have a degree of self-protection during initial contact with the bore that steel rings do not. This is why drier assembly works on grey cast iron — and why it would be incorrect for modern steel rings.
The short version: do not use modern detergent oil, synthetic oil, or any "energy conserving" oil for break-in. Do not use Castrol GTX.
Cylinder Preparation and Ring Specs
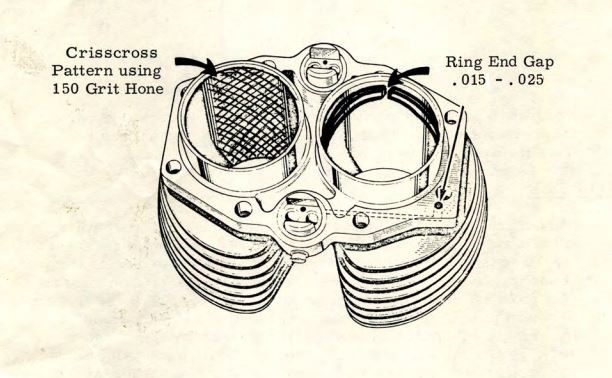
Grey cast iron rings require a cylinder finish of 150–220 grit. We recommend 180 grit. Modern ductile iron and steel rings are available and do work in British engines, but they require significantly more setup time and cost — for most builds, grey cast iron is the correct choice.
Recommended cylinder-to-piston clearance of .0015" per inch of bore gives you .0035"–.005" on a standard bore. We set our cylinders at .0045" when running cast JCC pistons. Forged pistons require more clearance — contact the piston manufacturer for the correct figure.
When washing the cylinder before assembly, use hot soapy water rather than solvent. Hot soapy water is far more effective at removing hone debris. Rinse well, dry thoroughly, and run a lint-free cloth through the bore. Do not use compressed air alone.
The Drier Assembly Method
Because modern break-in oils are scarce and standard assembly oil works against ring seating, we use what we call drier assembly:
- Wash the cylinder in hot soapy water, rinse, dry completely, and wipe the bore with a lint-free cloth.
- Lubricate everything except the rings and cylinder bore — camshaft lobes, tappets, and a light film on the thrust faces of the pistons only.
- Leave the ring faces and the cylinder bore dry at assembly.
Install rings in this sequence: oil control ring first, then the second compression ring, then the first compression ring. Use piston ring pliers — never pull rings by hand or with a screwdriver. Overstretching a ring distorts its round profile and destroys its sealing ability. The damage may not be visible but it will show up as blow-by.
When installing: any markings or writing on the ring face upward toward the cylinder head. If the ring has an inside bevel, that bevel faces up. If you are uncertain, check with the manufacturer — do not guess. Before installing the piston, rotate the ring gaps so they are staggered approximately 120° apart from each other. This reduces blow-by at initial start-up while the rings are still seating. Verify each ring rotates freely in its groove before proceeding.
Ring end gap: Factory specs from older workshop manuals no longer apply to current production rings. Most modern replacement rings specify .015"–.028". The only situation requiring real concern is a ring with zero end gap. For Triumph specifically, Service Bulletin No. 323 (October 1969) updated the ring gap specification from the original 0.010"–0.014" to 0.015"–0.020", applying to 650cc engines from engine no. DU44934 and 500cc engines from engine no. H49837.
Download Triumph Service Bulletin No. 323 — Piston Ring Gaps (PDF).
Break-In Oil
Use SAE 30 non-detergent oil for break-in. It is available at most auto parts stores. Non-detergent oil has no friction modifiers and will not prevent the rings from contacting the cylinder. Change to your regular running oil after break-in is complete.
The Break-In Procedure
Before starting the engine, verify oil pressure by turning the motor over with the spark plugs out until oil pressure registers. Once oil is circulating, follow this procedure:
- Start the engine and ride immediately. Do not let the engine sit at idle. Extended idling is actively harmful during break-in: low oil pump output at idle means inadequate lubrication exactly when frictional heat from the adaptation process is highest. It does not seat rings — it glazes bores and starves bearings.
- Accelerate briskly through the gears. Keep RPM between 3,500–5,000 RPM during acceleration. Do not lug the engine — load is what forces the rings against the cylinder wall.
- After 3–5 acceleration stints, shut the engine off and let it cool for at least 10 minutes. The cooling and heating cycle helps the rings conform to the bore.
- Repeat the ride-and-cool cycle 3–4 times, then park the motorcycle overnight until completely cold.
- The next day: recheck all base nuts and cylinder head bolts before riding.
- First 300 miles: ride normally but avoid long stretches at constant RPM (sustained highway cruising). Vary the throttle.
- At 300 miles: re-torque all top-end fasteners and reset valve clearances.
- At 500 miles: change the oil to Shell Rotella T (diesel-rated). Rotella still contains ZDDP, which is essential for flat-tappet engines.
- At 1,000 miles: recheck fasteners one final time.
The reason brisk acceleration helps — not harms — the engine during break-in is that combustion pressure behind the ring is what forces it into contact with the cylinder. Loading the engine creates that pressure. Babying a fresh engine at low RPM does not seat rings; it glazes bores.
Frequently Asked Questions
Why is my motorcycle smoking after a rebuild?
Smoking after a rebuild almost always means the rings did not seat. The most common causes are using modern friction-modified oil during break-in, insufficient cylinder load during the break-in ride (too much idling, not enough acceleration), or a bore finish that was too smooth for grey cast iron rings. If the bore has glazed over, it will need to be re-honed with fresh rings before trying again.
Can I use synthetic oil for break-in?
No. Pure synthetics and modern semi-synthetic oils with friction modifiers can prevent grey cast iron rings from ever contacting the cylinder wall. Use SAE 30 non-detergent conventional oil for break-in. Switch to Shell Rotella or equivalent ZDDP oil at 500 miles.
What cylinder hone grit should I use for grey cast iron rings?
150–220 grit, with 180 grit being our recommendation. Modern steel rings require a finer finish, but grey cast iron rings need the coarser surface to seat correctly.
How long does ring seating take?
With correct procedure, rings should be substantially seated within the first 50–100 miles. The first 300 miles are the critical window. Smoking should diminish noticeably after the first heat cycle and should be minimal or gone by 100–150 miles if everything was done correctly.
What is piston-to-cylinder clearance for a Triumph or BSA?
We set our cylinders at .0045" clearance when running cast JCC pistons on a standard bore. Forged pistons require more clearance — contact your piston supplier for the specific figure. The general guideline is .0015" per inch of bore diameter.
What is the correct ring end gap for a Triumph 650 or 500?
Triumph Service Bulletin No. 323 (October 1969) updated the ring gap specification to 0.015"–0.020" for all 650cc engines from engine no. DU44934 and 500cc engines from engine no. H49837. This supersedes the original workshop manual figure of 0.010"–0.014". If you are running an earlier engine or are unsure, use the 0.015"–0.020" figure — the updated spec applies to proprietary pistons fitted with rings.